User Guide
Welcome to the SOCareers User Guide! In this guide, we explain how to use the features available in SOCareers.
Why choose SOCareers?
While we were applying to internships in our second year, we quickly realised how tedious it was to record everything in various Excel sheets and Word documents, so SOCareers was born!
SOCareers is your ultimate companion to managing your professional connections and internship applications. Designed with School of Computing (SoC) students in mind, it is optimised for use via a Command Line Interface (CLI). If you can type fast, SOCareers enables you to organise your information more efficiently than traditional Graphical User Interface (GUI) apps.
How to use our guide
Our user guide provides the format of every command available in SOCareers as well as examples to show you how to use each command.
If you are a new user, we recommend you look through our Quick Start guide. With installation instructions, an overview of our GUI and a tutorial on how to use the CLI, it has everything to get you acquainted with SOCareers!
If you are an experienced user, you can use the Table of Contents to easily find guides on your desired commands. A command summary is also available if you prefer to have a quick reference for our command formats!
Throughout our user guide, you will encounter different text formats or call-out boxes. Here are what they mean:
![]() Warning
Warning
Information that is important to know to prevent unexpected or undefined behaviour from SOCareers.
![]() Parameter Information
Parameter Information
Details about parameters and their constraints to ensure SOCareers works as intended.
![]() Tip
Tip
Handy tips to enhance your experience with SOCareers.
![]() Additional Information
Additional Information
Additional information to enrich your understanding of SOCareers.
Highlighted text: Links to jump to the corresponding sections in the user guide
Monospaced text: Command formats to guide your usage of SOCareers
Table of Contents
- Quick Start
- Features
- Frequently Asked Questions (FAQ)
- Known Limitations
- Command Summary
Quick Start
Installation
-
Ensure you have Java
11or above installed in your computer by running the commandjava --versionin your terminal. -
Download the latest version of
SOCareers.jarhere. -
Move
SOCareers.jarto the home folder which is the folder you want to store SOCareers’ internal data.
![]() Additional Information
Additional Information
The home folder’s contents may be changed by SOCareers. We recommend you to create a new empty folder to act as your home folder.
Running SOCareers
- Open a command terminal.
- Navigate your home folder by running the command
cd FILEPATHwhereFILEPATHis the file path to your home folder. - Run the command
java -jar SOCareers.jarto start the application.- A GUI similar to the one shown below should appear in a few seconds.
- Note that the app contains some sample data that you can later remove.
- Our User Interface (UI) has 6 main sections:
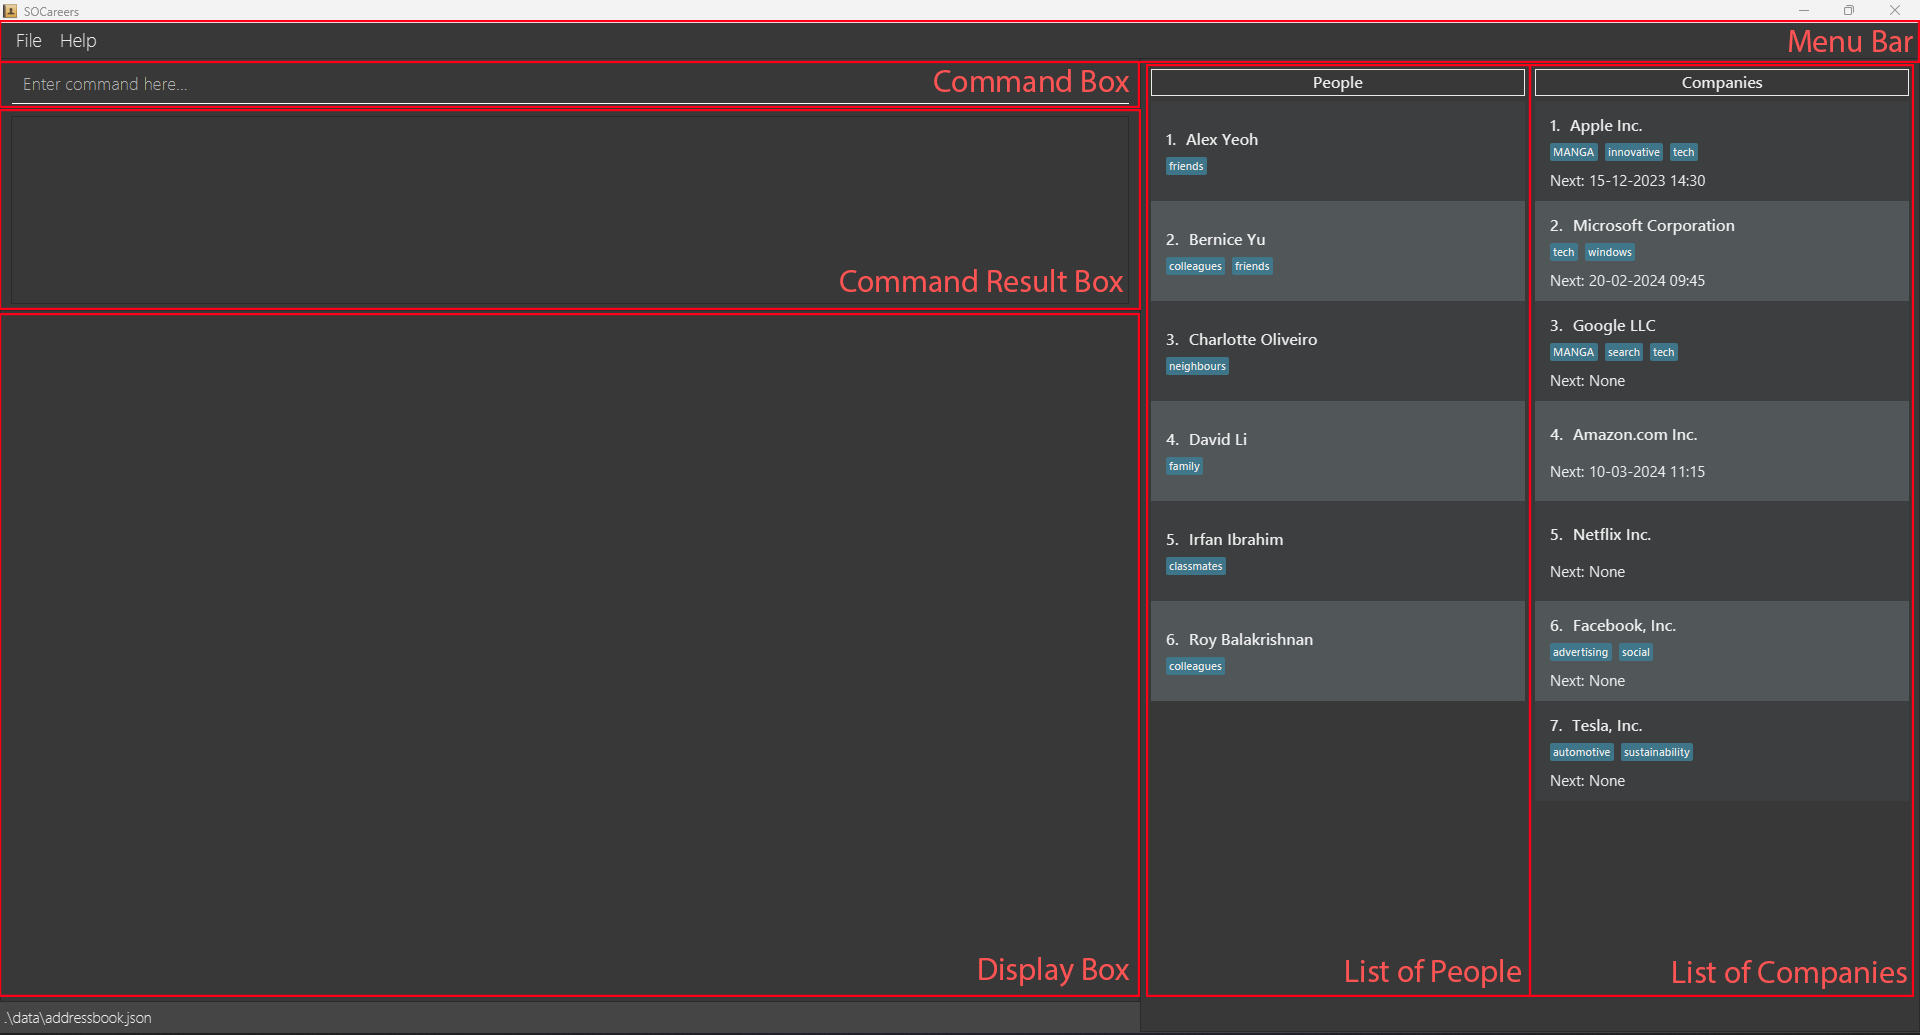
- MenuBar: Provides quick access to essential features of “Help” and “File”.
- Command Box: Allows you to type in your commands.
- Command Result Box: Displays the result of running a command.
- Display Box: Displays all the details of a person or a company after certain commands are run.
- List of Persons: Displays brief details of every person added. The index, name and tags for each person are displayed here.
-
List of Companies: Displays brief details of every company added. The index, name, tags and the date of the
next internship interview (represented by the “Next:” field) for each company are displayed here.
-
Type the command in the command box and press Enter to run it. Here are some examples of commands you can run:
-
list p: Lists all persons -
add p n/John Doe p/98765432 e/johnd@example.com a/311 Clementi Ave 2 #02-25 t/friends t/colleagues: Adds the person ‘John Doe’ with the following details:- Phone number: 98765432
- Email: johnd@example.com
- Address: 311 Clementi Ave 2 #02-25
- Tags: friends, colleagues
-
delete c 3: Deletes the third company shown in the current list of companies -
exit: Exits SOCareers
-
![]() Notes about the command format:
Notes about the command format:
- Words in
UPPER_CASEare the parameters to be supplied by the user.
- e.g. in
add p n/NAME p/PHONE_NUMBER e/EMAIL a/ADDRESS, all the parameters must be supplied.
- e.g. in
- Items in square brackets are optional.
- e.g.
n/NAME [t/TAG]can be used asn/John Doe t/friendor asn/John Doe.
- e.g.
- Parameters can be in any order.
- e.g. if the command specifies
n/NAME p/PHONE_NUMBER e/EMAIL,e/EMAIL p/PHONE_NUMBER n/NAMEis also acceptable.
- e.g. if the command specifies
![]() Warning
Warning
If you are using a PDF version of this document, be careful when you copy and paste commands that span multiple lines
as space characters surrounding line-breaks may be omitted when copied over to the application.
You can refer to the Prefix Summary section for a summary on constraints on prefixes and the
Features section below for details of each command.
Prefix Summary
| Prefix | Format | Example(s) |
|---|---|---|
a/ADDRESS |
Any characters | 311, Clementi Ave 2, #02-25 |
c/COMPANY_INDEX |
A positive integer (e.g. 1, 2, 3… 2147483647) that is smaller than the size of the list of companies that is currently displayed | 1, 10, 26 |
d/DESCRIPTION |
Any characters | A streaming service company |
e/EMAIL |
local-part@domain where the local-part only contains alphanumeric characters and the punctuation + _ . -, and domain is the email’s domain name containing only alphanumeric characters and the punctuation - . |
johnd@example.com |
i/INTERNSHIP_INDEX |
A positive integer (e.g. 1, 2, 3… 2147483647) that is smaller than the size of the list of internships that is currently displayed | 1, 10, 26 |
n/COMPANY_NAME |
Alphanumeric with spaces and the punctuation & , . - | Apple Inc., AT&T |
n/PERSON_NAME |
Alphabetical with spaces | John Doe |
n/ROLE_NAME |
Any characters | Finance Intern 2024 |
n/KEYWORD |
Alphanumeric without spaces and the punctuation & , . - | John, Doe |
p/PHONE_NUMBER |
Numerical | 91234567 |
s/SCHEDULED_INTERVIEW_TIME |
DD-MM-YYYY HH:mm where DD is the day, MM is the month, YYYY is the year and HH:mm is the time in 24-hour notation |
20-02-2024 09:45 |
t/TAG |
Alphanumeric | CS2103T |
start/START_TIME |
DD-MM-YYYY HH:mm where DD is the day, MM is the month, YYYY is the year and HH:mm is the time in 24-hour notation |
20-02-2024 09:45 |
end/END_TIME |
DD-MM-YYYY HH:mm where DD is the day, MM is the month, YYYY is the year and HH:mm is the time in 24-hour notation |
20-02-2024 09:45 |
Features
Viewing the User Guide: help
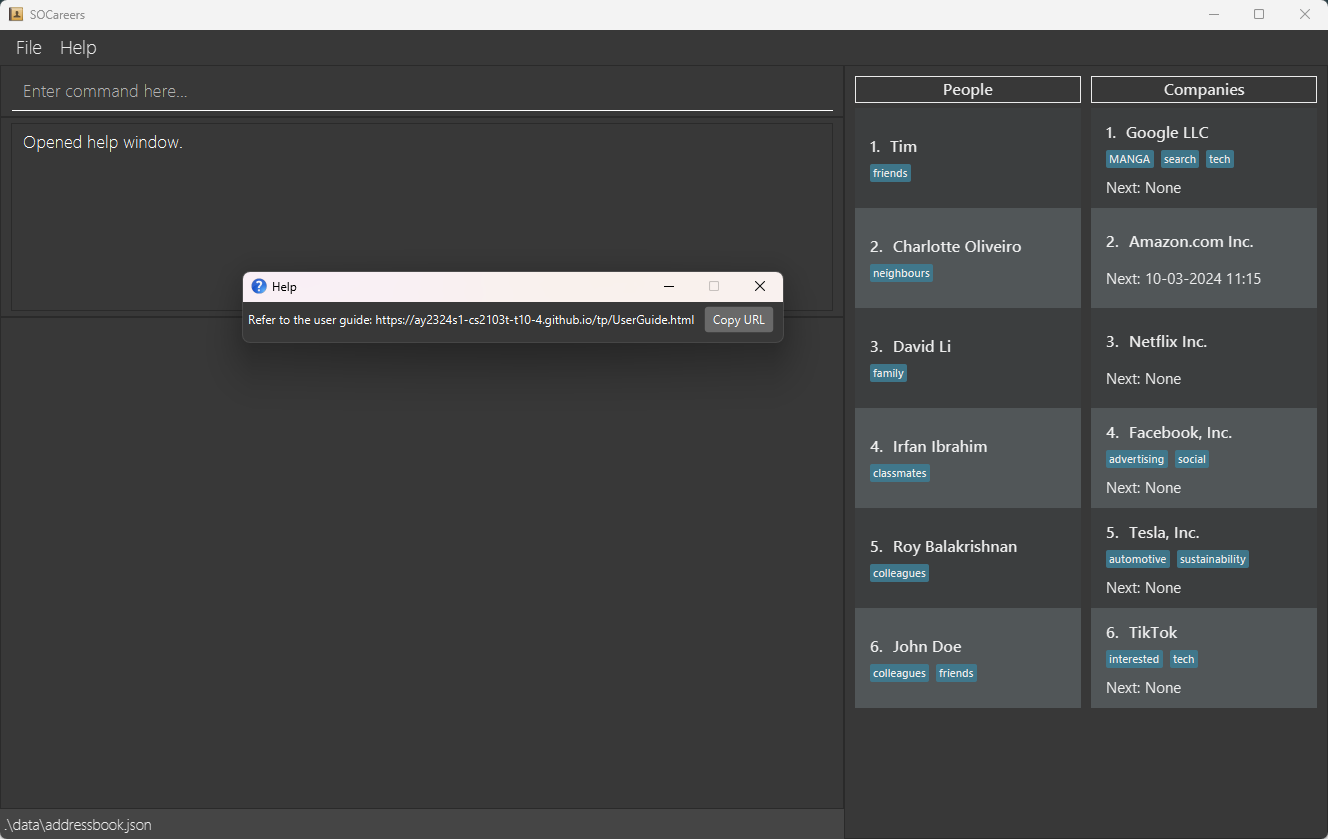
Find help easily by accessing a link to this user guide.
Format: help
Example: help
- Provides you with a link to our user guide in a pop-up box
Adding a contact: add
Adding a person: add p
Keep track of who you know easily by adding them to your contacts.
Format: add p n/PERSON_NAME p/PHONE_NUMBER e/EMAIL a/ADDRESS [t/TAG]
![]() Parameter Information
Parameter Information
-
TAGcan be used multiple times in one command -
NAMEcannot have consecutive spaces
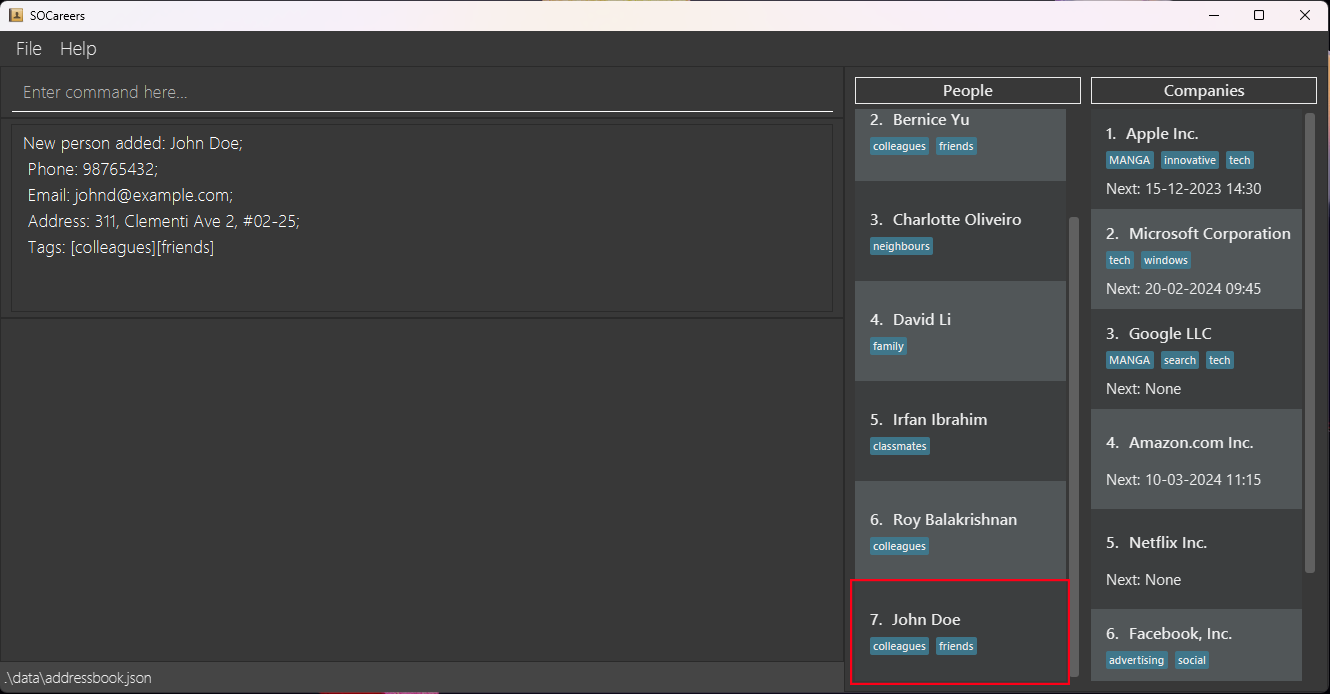
Example: add p n/John Doe p/98765432 e/johnd@example.com a/311, Clementi Ave 2, #02-25 t/friends t/colleagues
- Adds the person named ‘John Doe’ to the list of persons with the following details:
- Phone number: 98765432
- Email: johnd@example.com
- Address: 311, Clementi Ave 2, #02-25
- Tags: friends, colleagues
- After running the command, the output in the UI should be similar to the one shown below. The newly added
person has been highlighted in red for clarity:
Adding a company: add c
Keep track of your favourite companies effortlessly by adding them to your contacts.
Format: add c n/COMPANY_NAME p/PHONE_NUMBER e/EMAIL d/DESCRIPTION [t/TAG]
![]() Parameter Information
Parameter Information
TAG can be used multiple times in one command
Example: add c n/TikTok p/98765432 e/tiktokHiring@example.com d/Top Tech Company t/tech t/interested
- Adds the company named ‘TikTok’ to the list of companies with the following details:
- Phone number: 98765432
- Email: tiktokHiring@example.com
- Description: Top Tech Company
- Tags: tech, interested
- After running the command, the output in the UI should be similar to the one shown below. The newly added
company has been highlighted in red for clarity:

![]() Additional Information
Additional Information
Internships must be added separately using the add i command
Adding an internship: add i
Keep track of your dream internships efficiently by adding them to their respective companies.
Format: add i INDEX n/ROLE_NAME d/DESCRIPTION [s/SCHEDULED_INTERVIEW_TIME]
![]() Parameter Information
Parameter Information
- The
INDEXmust be:
- a positive integer (e.g. 1, 2, 3…) with a maximum value of 2147483647
- smaller than the size of the list of companies that is currently displayed
- a positive integer (e.g. 1, 2, 3…) with a maximum value of 2147483647
-
The
INDEXdepends on the currently displayed list of companies which changes as you sort companies or search for specific companies -
SCHEDULED_INTERVIEW_TIMEcan only be used once and must be in the formatDD-MM-YYYY HH:mmwhereDDis the day,MMis the month,YYYYis the year andHH:mmis the time in 24-hour notation. If the internship time’s day is set between the last day of a month and the 31st of a month in months with fewer than 31 days, the internship will be registered, but the date will be automatically adjusted to the final day of that month.
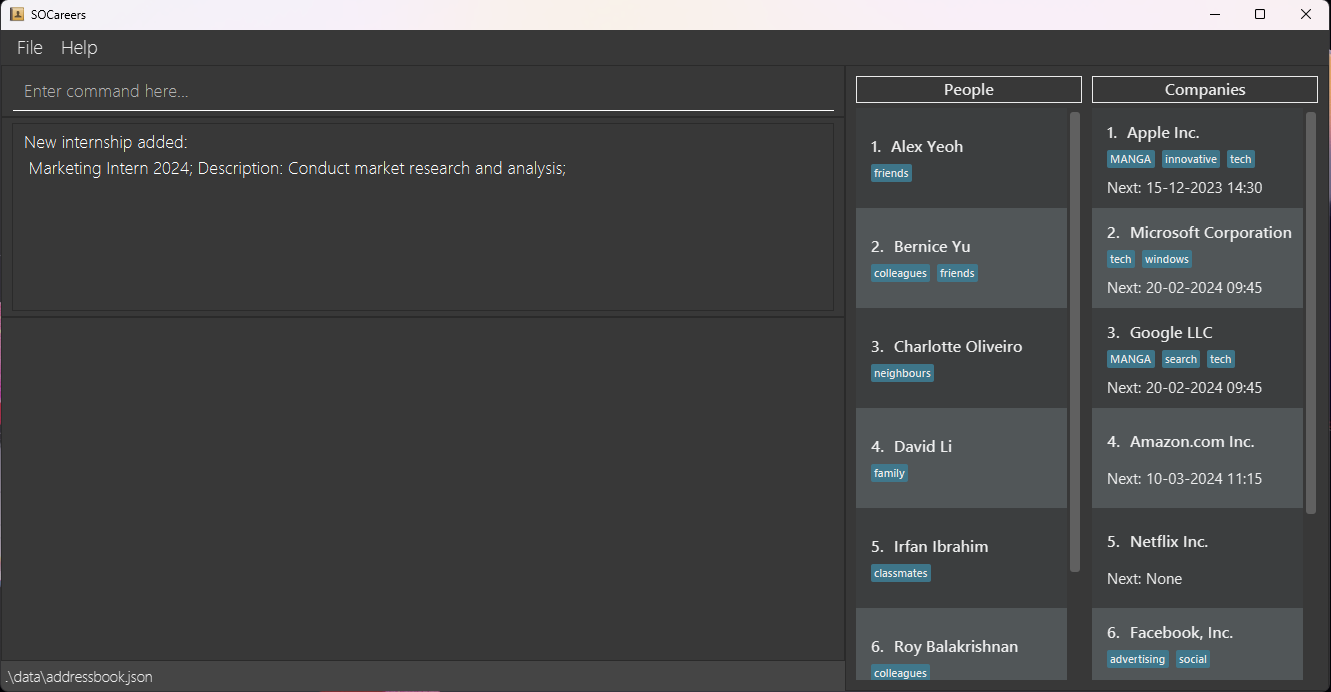
Example: add i 3 n/Marketing Intern 2024 d/Conduct market research and analysis s/20-02-2024 09:45
- Adds the internship named ‘Marketing Intern 2024’ to the third company in the list of companies with the following details:
- Description: Conduct market research and analysis
- Scheduled interview time: 20 February 2024, 9.45am
- After running the command, the output in the UI should be similar to the one shown below:
![]() Tip
Tip
![]() Additional Information
Additional Information
The added internship may not always appear at the bottom of the list of internships! This is because the
list of internships is sorted by SCHEDULED_INTERVIEW_TIME, with the internship with the earliest
SCHEDULED_INTERVIEW_TIME being displayed first.
Listing contacts: list
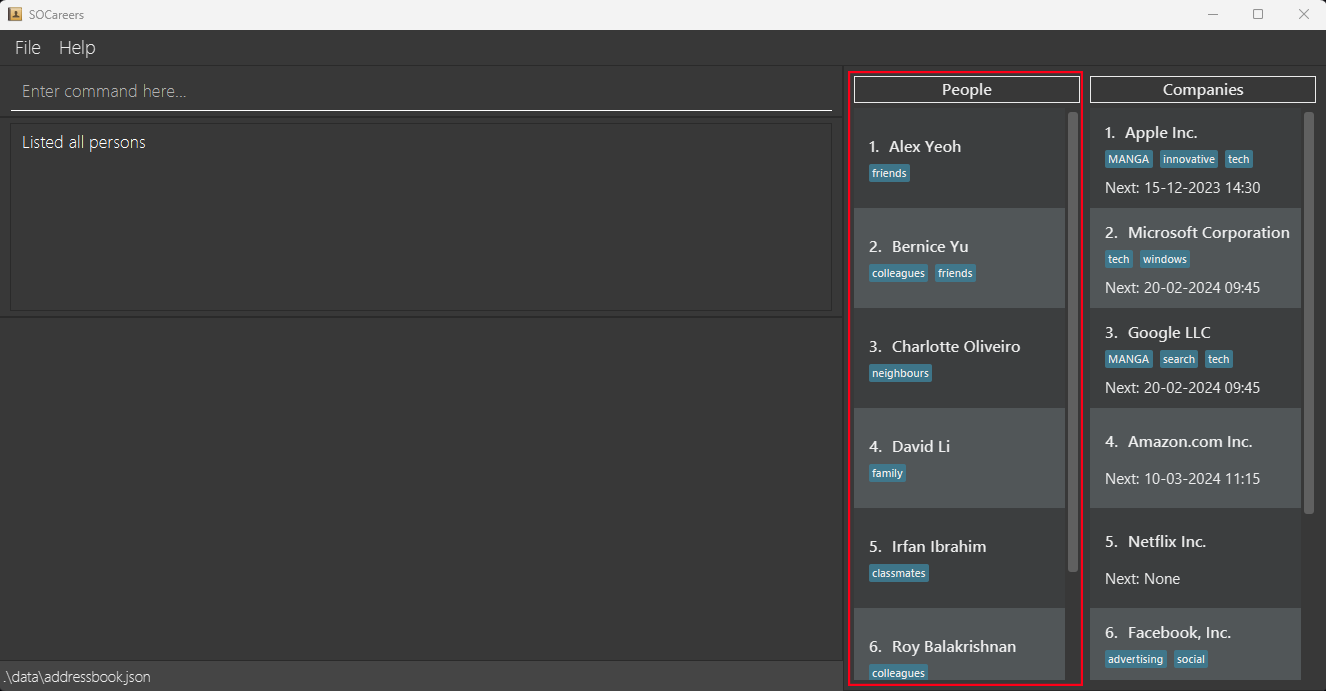
Listing all persons: list p
Have a quick overview of all the people you know by viewing your list of persons.
Format: list p
Example: list p
- Shows the full, unfiltered list of persons currently in your contacts
- After running the command, the output in the UI should be similar to the one shown below. The full list of persons
has been highlighted in red for clarity:
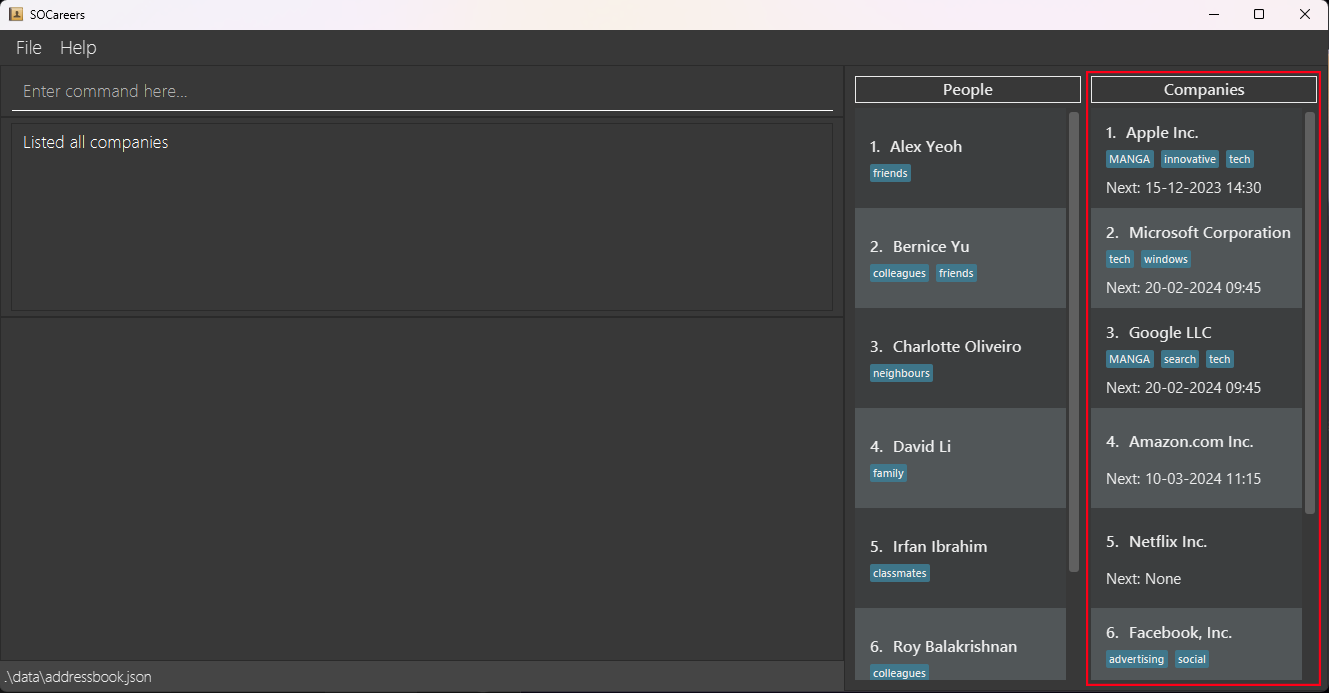
Listing all companies: list c
Have a quick overview of all the companies you are interested in by viewing your list of companies.
Format: list c
Example: list c
- Shows the full, unfiltered list of companies currently in your contacts
- After running the command, the output in the UI should be similar to the one shown below. The full list of companies
has been highlighted in red for clarity:
Deleting a contact: delete
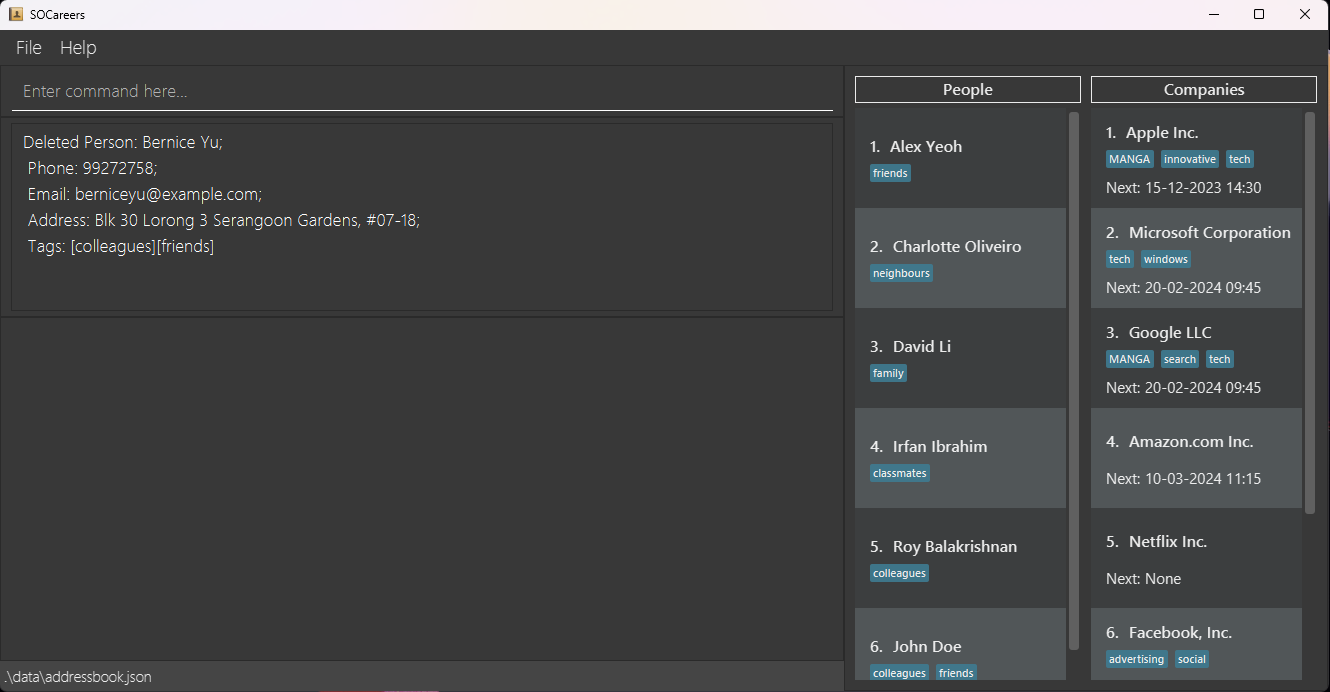
Deleting a person: delete p
Keep your list of persons organised by deleting contacts you no longer need.
Format: delete p INDEX
![]() Parameter Information
Parameter Information
- The
INDEXmust be:
- a positive integer (e.g. 1, 2, 3…) with a maximum value of 2147483647
- smaller than the size of the list of persons that is currently displayed
- a positive integer (e.g. 1, 2, 3…) with a maximum value of 2147483647
- The
INDEXdepends on the currently displayed list of persons which changes as you search for specific people
Example: delete p 2
- Deletes the second person in the list of persons
- After running the command, the output in the UI should be similar to the one shown below:
![]() Tip
Tip
- You can use the command
list pto view all persons and their respective indexes before running this command
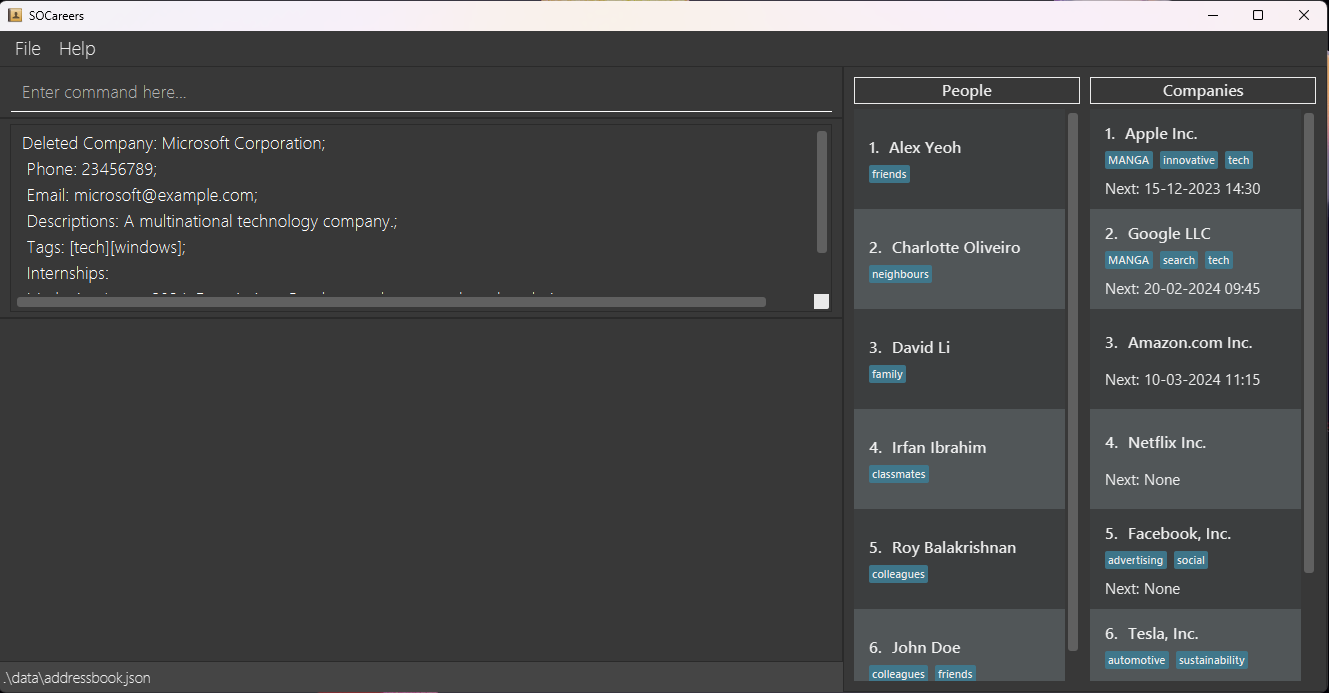
Deleting a company: delete c
Keep your list of companies organised by deleting companies you are no longer interested in.
Format: delete c INDEX
![]() Parameter Information
Parameter Information
- The
INDEXmust be:
- a positive integer (e.g. 1, 2, 3…) with a maximum value of 2147483647
- smaller than the size of the list of companies that is currently displayed
- The
INDEXdepends on the currently displayed list of companies which changes as you sort companies or search for specific companies
Example: delete c 2
- Deletes the second company in the list of companies
- After running the command, the output in the UI should be similar to the one shown below:
![]() Tip
Tip
- You can use the command
list cto view all companies and their respective indexes before running this command.
Deleting an internship: delete i
Keep your list of internships for each company organised by deleting internships you are no longer interested in.
Format: delete i c/COMPANY_INDEX i/INTERNSHIP_INDEX
![]() Parameter Information
Parameter Information
- The
COMPANY_INDEXandINTERNSHIP_INDEXmust each be:
- a positive integer (e.g. 1, 2, 3…) with a maximum value of 2147483647
- smaller than the size of their respective lists that are currently displayed
- The
COMPANY_INDEXdepends on the currently displayed list of companies which changes as you sort companies or search for specific companies
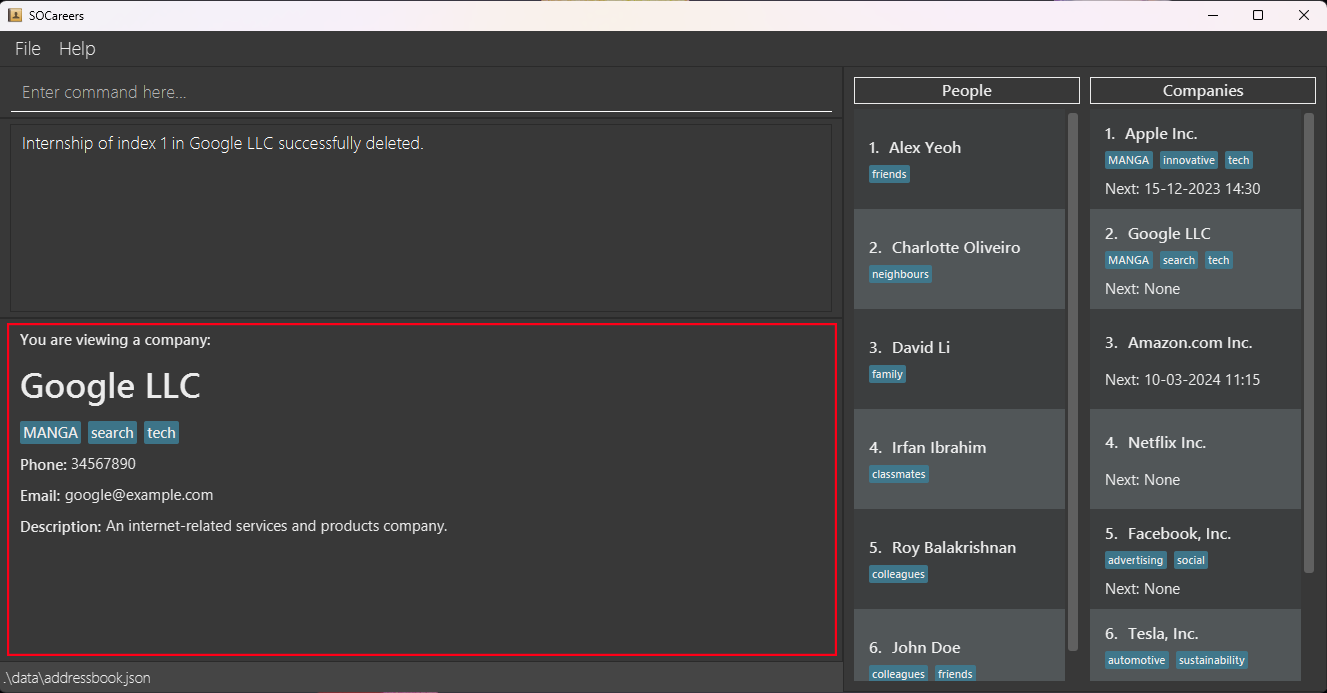
Example: delete i c/2 i/1
- Deletes the first internship of the second company in the list of companies that is currently displayed
- After running the command, the output in the UI should be similar to the one shown below.
The company you have just deleted the internship from will also be shown in the display box which has been highlighted
in red for clarity:
![]() Tip
Tip
Viewing a contact: view
Viewing a person: view p
Review the information you included about the people you know efficiently by viewing their respective contacts.
Format: view p INDEX
![]() Parameter Information
Parameter Information
- The
INDEXmust be:
- a positive integer (e.g. 1, 2, 3…) with a maximum value of 2147483647
- smaller than the size of the list of persons that is currently displayed
- a positive integer (e.g. 1, 2, 3…) with a maximum value of 2147483647
- The
INDEXdepends on the currently displayed list of persons which changes as you search for specific people
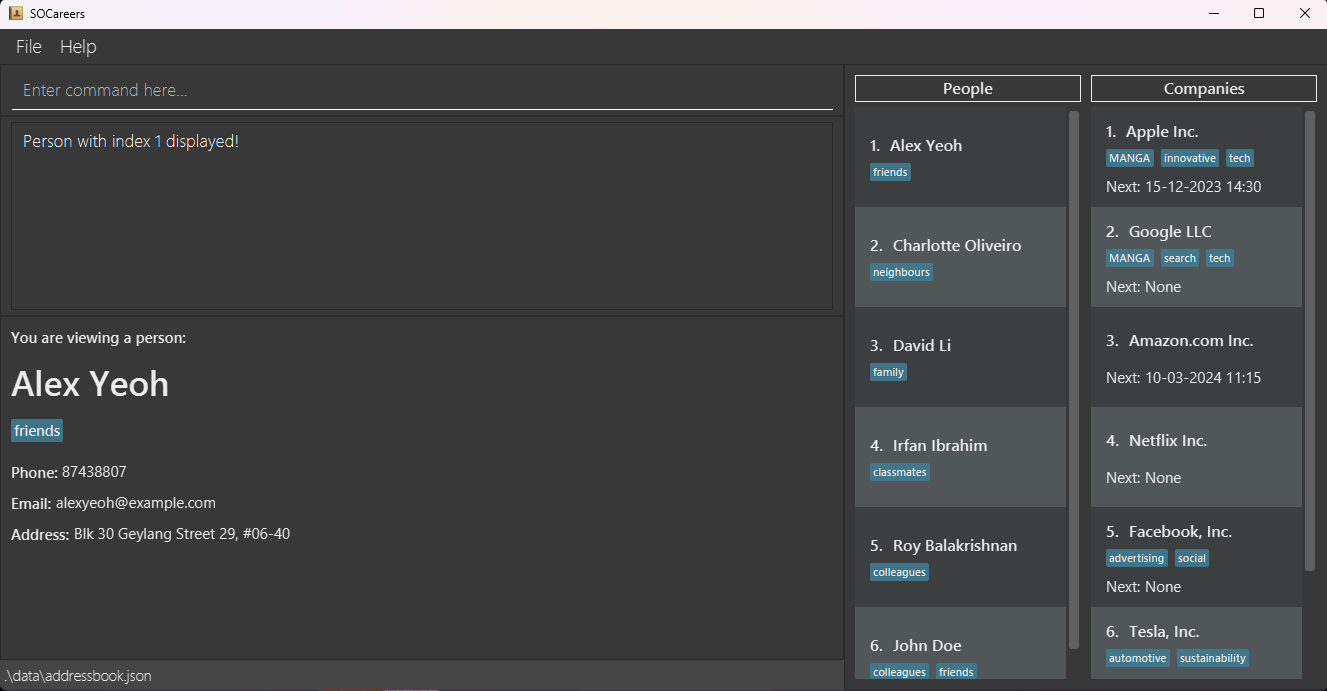
Example: view p 1
- Displays the first contact in the person list in the display box
- After running the command, the output in the UI should be similar to the one shown below:
![]() Tip
Tip
- You can use the command
list pto view all the persons and their indexes before running this command.
Viewing a company: view c
Review the information you included about the companies you are interested in and all their associated internships by viewing their respective contacts.
Format: view c INDEX
![]() Parameter Information
Parameter Information
- The
INDEXmust be:
- a positive integer (e.g. 1, 2, 3…) with a maximum value of 2147483647
- smaller than the size of the list of companies currently displayed
- a positive integer (e.g. 1, 2, 3…) with a maximum value of 2147483647
- The
INDEXdepends on the currently displayed list of companies which changes as you sort companies or search for specific companies
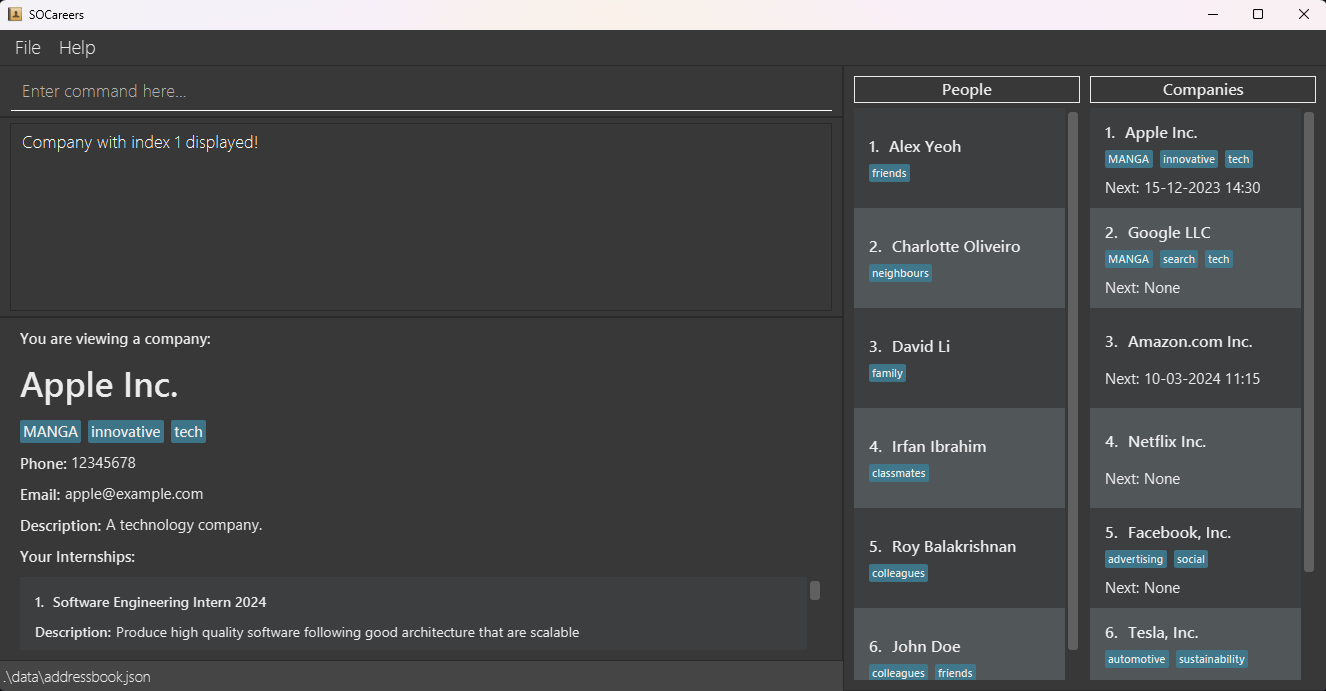
Example: view c 1
- Displays the first contact in the companies list in the display box
- After running the command, the output in the UI should be similar to the one shown below:
![]() Tip
Tip
- You can use the command
list cto view all the companies and their indexes before running this command.
Editing a contact: edit
Editing a person: edit p
Keep your information on the people you know up-to-date by editing their respective contacts.
Format: edit p INDEX [n/PERSON_NAME] [p/PHONE_NUMBER] [e/EMAIL] [a/ADDRESS] [t/TAG]
![]() Parameter Information
Parameter Information
-
At least one of the
PERSON_NAME,PHONE_NUMBER,EMAIL,ADDRESSorTAGparameters should be included - The
INDEXmust be:
- a positive integer (e.g. 1, 2, 3…) with a maximum value of 2147483647
- smaller than the size of the list of persons currently displayed
- a positive integer (e.g. 1, 2, 3…) with a maximum value of 2147483647
-
The
INDEXdepends on the currently displayed list of persons which changes as you search for specific persons -
If a parameter is unspecified, its value will not be edited
-
TAGcan be used multiple times in one command
![]() Warning
Warning
Editing the tags of a person overwrites any tags the person currently has
- Add the tags you would like to keep to the command to ensure that they are not removed
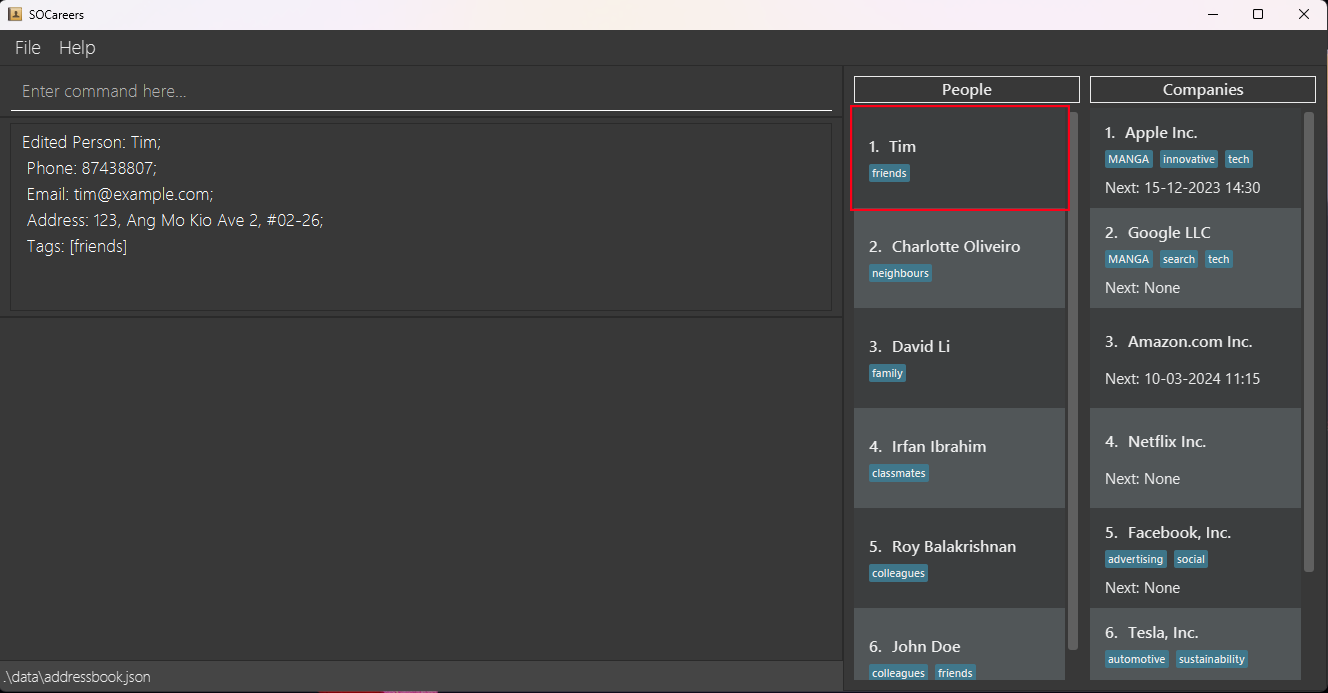
Example: edit p 1 n/Tim e/tim@example.com a/123, Ang Mo Kio Ave 2, #02-26 t/friends
- Edits the first contact in the list of persons to have the following new details:
- Name: Tim
- Email: tim@example.com
- Address: 123, Ang Mo Kio Ave 2, #02-26
- Tags: friends
- After running the command, the output in the UI should be similar to the one shown below.
The corresponding person in the list of persons will be updated. This has been highlighted in red for clarity:
![]() Tip
Tip
Editing a company: edit c
Keep your information on the companies you are interested in up-to-date by editing their respective contacts.
Format: edit c INDEX [n/COMPANY_NAME] [p/PHONE_NUMBER] [e/EMAIL] [d/DESCRIPTION] [t/TAG]
![]() Parameter Information
Parameter Information
-
At least one of the
COMPANY_NAME,PHONE_NUMBER,EMAIL,DESCRIPTIONorTAGparameters should be included - The
INDEXmust be:
- a positive integer (e.g. 1, 2, 3…) with a maximum value of 2147483647
- smaller than the size of the list of companies currently displayed
-
The
INDEXdepends on the currently displayed list of companies which changes as you sort companies or search for specific companies -
If a parameter is unspecified, its value will not be edited
-
TAGcan be used multiple times in one command
![]() Warning
Warning
Editing the tags of a company overwrites any tags the company currently has
- Add the tags you would like to keep to the command to ensure that they are not removed
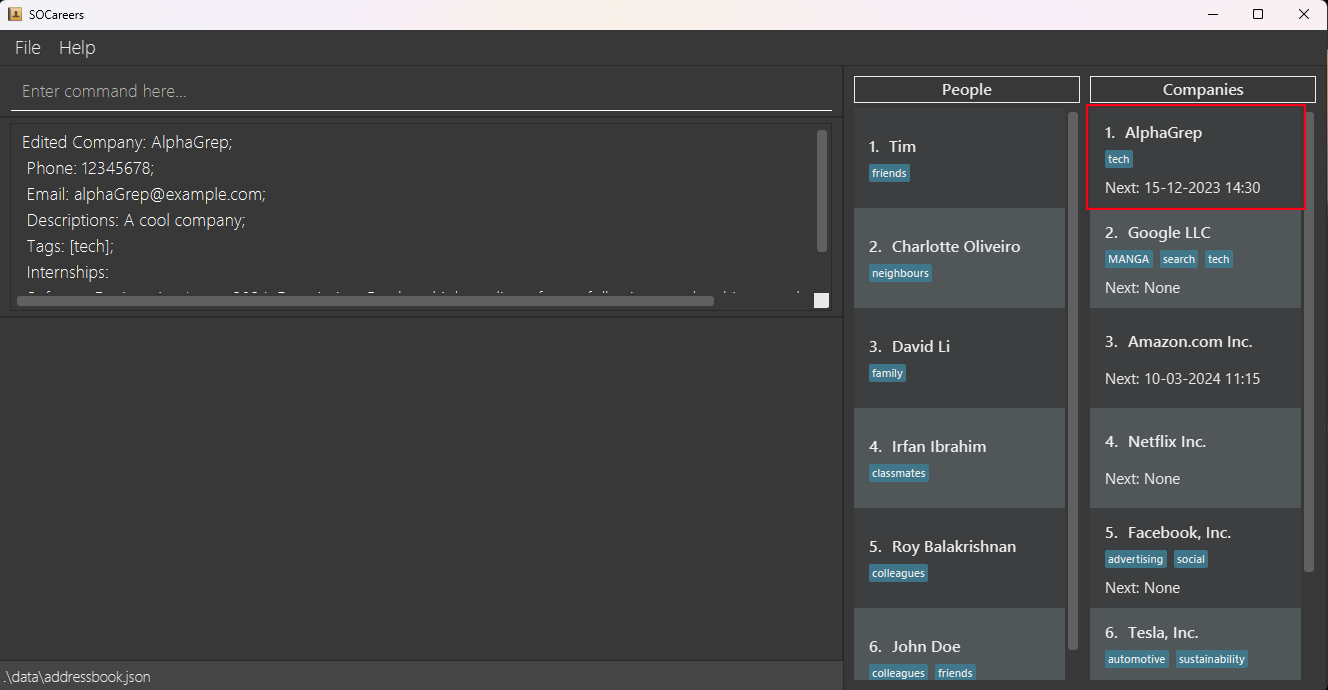
Example: edit c 1 n/AlphaGrep e/alphaGrep@example.com d/A cool company t/tech
- Edits the first contact in the list of companies to have the following new details:
- Name: AlphaGrep
- Email: alphaGrep@example.com
- Description: A cool company
- Tags: tech
- After running the command, the output in the UI should be similar to the one shown below.
The corresponding company in the list of companies will be updated. This has been highlighted in red for clarity:
![]() Tip
Tip
Editing an internship: edit i
Keep your information on your dream internships up-to-date by editing them.
Format: edit i c/COMPANY_INDEX i/INTERNSHIP_INDEX [n/ROLE_NAME] [d/DESCRIPTION] [s/SCHEDULED_INTERVIEW_TIME]
![]() Parameter Information
Parameter Information
-
At least one of the
ROLE_NAME,DESCRIPTIONorSCHEDULED_INTERVIEW_TIMEparameters should be included - The
COMPANY_INDEXandINTERNSHIP_INDEXmust each be:
- a positive integer (e.g. 1, 2, 3…) with a maximum value of 2147483647
- smaller than the size of their respective lists currently displayed
- a positive integer (e.g. 1, 2, 3…) with a maximum value of 2147483647
-
The
COMPANY_INDEXdepends on the currently displayed list of companies which changes as you sort companies or search for specific companies - If a parameter is unspecified, its value will not be edited
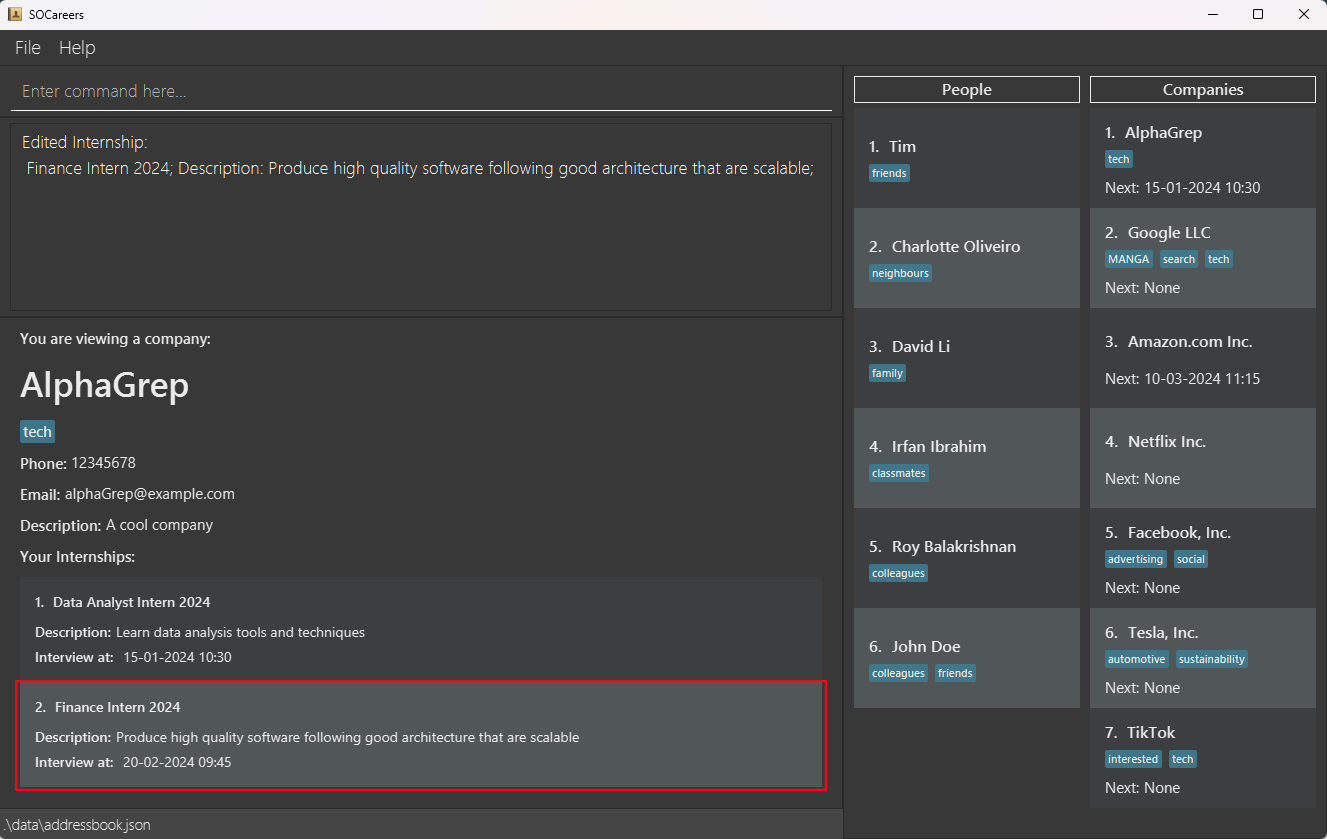
Example: edit i c/1 i/1 n/Finance Intern 2024 s/20-02-2024 09:45
- Edits the first internship of the first company in the list of companies to have the following new details:
- Name: Finance Intern 2024
- Scheduled interview time: 20 February 2024, 9.45am
- After running the command, the output in the UI should be similar to the one shown here. The corresponding internship
will be updated. This has been highlighted in red for clarity:
![]() Tip
Tip
![]() Additional Information
Additional Information
The index of the internship may change after editing its scheduled interview time! This is because the
list of internships is sorted by SCHEDULED_INTERVIEW_TIME, with the internship with the earliest
SCHEDULED_INTERVIEW_TIME being displayed first.
Finding a contact: find
Finding a person by name or tag: find p
Find people you know in your contacts quickly by searching for them by their name or using a tag you have assigned to them.
Format: find p [n/KEYWORD] [t/TAG]
![]() Parameter Information
Parameter Information
-
At least one of the
KEYWORDorTAGparameters should be included -
KEYWORDandTAGcan be used multiple times in one command-
KEYWORDmust be alphabetical -
TAGmust be alphanumeric -
KEYWORDandTAGcannot contain spaces or special characters
-
![]() Additional Information
Additional Information
-
The search is case-insensitive (e.g.
johnwill matchJohn) -
Partial keywords are not supported (e.g.
Jowill not matchJohn)
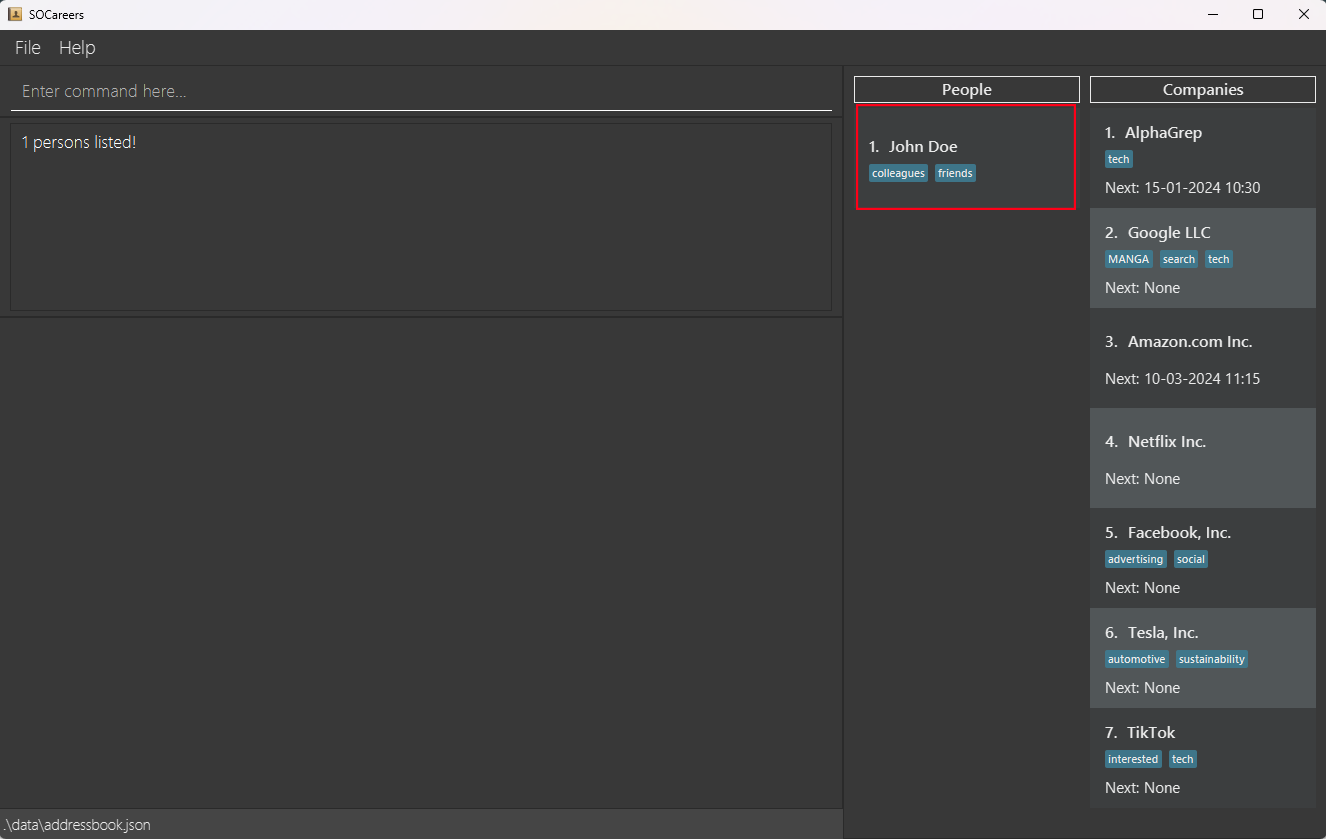
Example: find p n/John t/friend
- Updates the list of persons to list only those who match at least one of the specified names or tags
- After running the command, the output in the UI should be similar to the one shown below. The updated list of persons
has been highlighted in red for clarity:
Finding a company by name or tag: find c
Find a company you are interested in in your contacts quickly by searching for them by its name or using a tag you have assigned to it.
Format: find c [n/KEYWORD] [t/TAG]
![]() Parameter Information
Parameter Information
-
At least one of the
KEYWORDorTAGparameters should be included -
KEYWORDandTAGcan be used multiple times in one command-
KEYWORDmust be alphabetical -
TAGmust be alphanumeric -
KEYWORDandTAGcannot contain spaces or special characters
-
![]() Additional Information
Additional Information
-
The search is case-insensitive (e.g.
applewill matchApple) -
Partial keywords are not supported (e.g.
Apwill not matchApple)
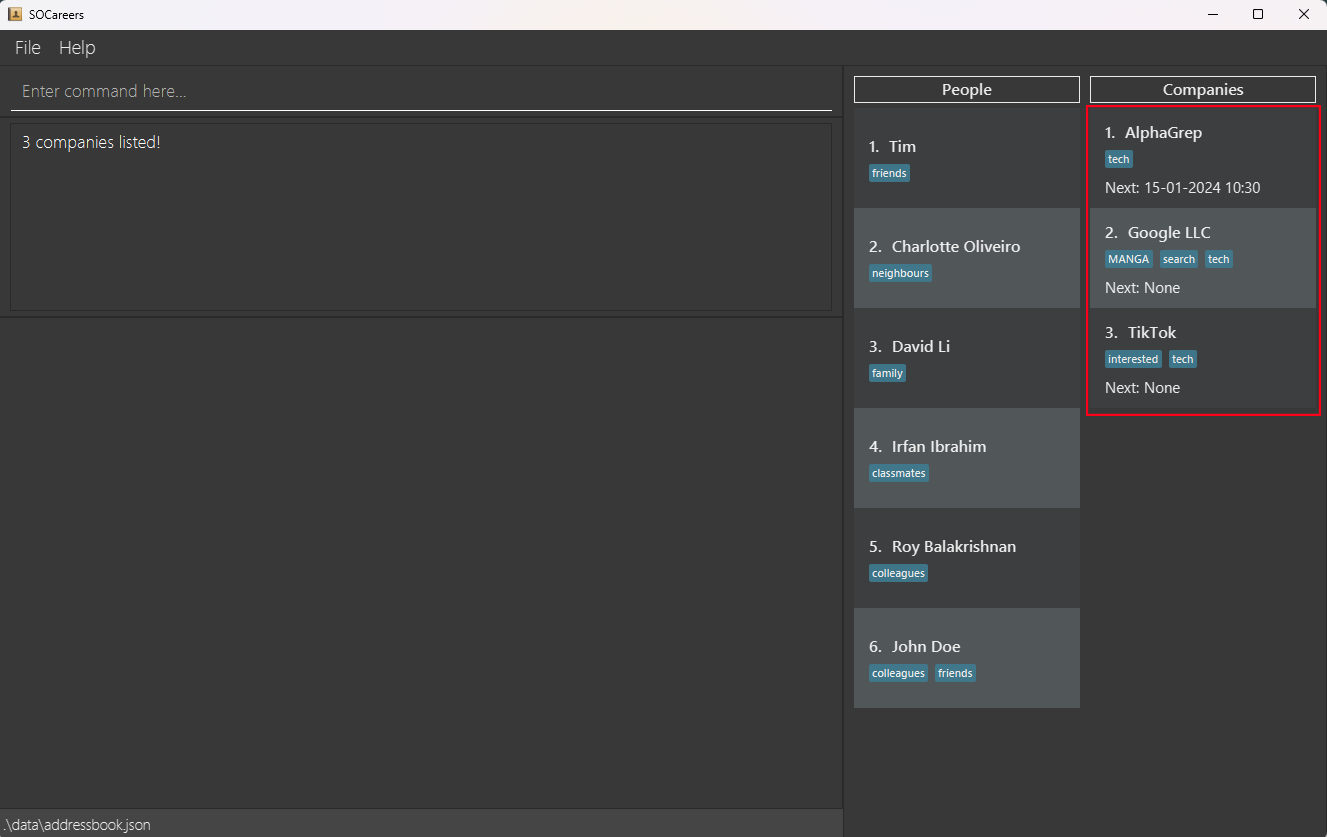
Example: find c n/AlphaGrep t/tech
- Updates the list of companies to list only those who match at least one of the specified names or tags
- After running the command, the output in the UI should be similar to the one shown below. The updated list of
companies has been highlighted in red for clarity:
Sorting contacts: sort
Sorting companies by scheduled interview time: sort c
Keep track of your upcoming interviews by sorting your company contacts by their earliest interviews within your specified time period.
Format: sort c [start/START_DATETIME] [end/END_DATETIME]
![]() Parameter Information
Parameter Information
-
START_DATETIMEandEND_DATETIMEmust be in the formatDD-MM-YYYY HH:mmwhereDDis the day,MMis the month,YYYYis the year andHH:mmis the time in 24-hour notation. Note that if the start and/or end time’s day is set between the last day of a month and the 31st of a month in months with fewer than 31 days, the date is valid and will be automatically adjusted to the final day of that month. -
START_DATETIMEmust be beforeEND_DATETIME
- Otherwise, error message
Invalid command format...will be thrown.
- Otherwise, error message
-
START_DATETIMEandEND_DATETIMEare non-inclusive (i.e. internships with interviews onSTART_DATETIMEorEND_DATETIMEwill not be included when sorting) -
START_DATETIMEandEND_DATETIMEcan be dates in the past or future -
START_DATETIMEandEND_DATETIMEcan only be used once each.
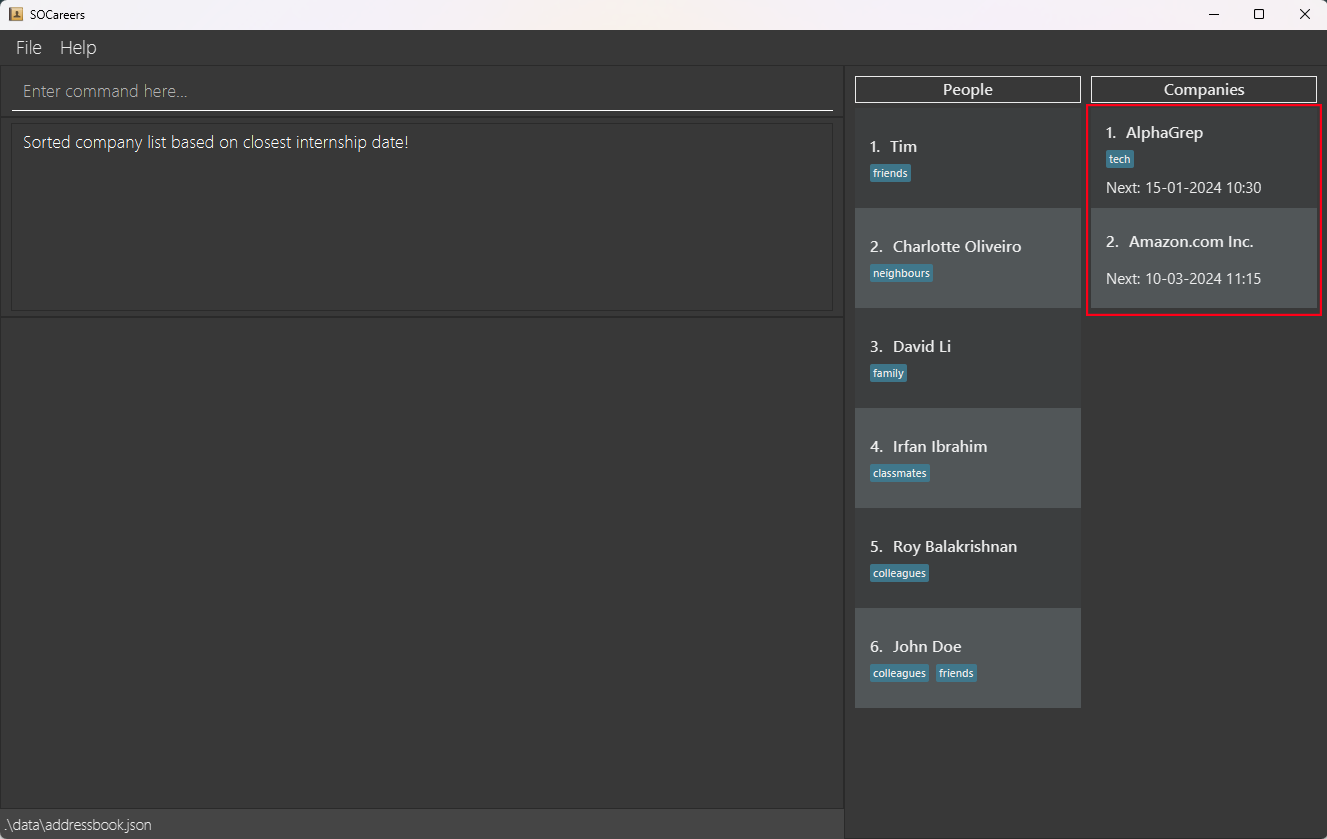
Example: sort c start/01-02-2024 00:01 end/01-04-2024 00:01
- Sorts and displays the companies that have internships with interviews between 1 February 2024, 12.01am and 1 April 2024, 12.01am, with the company with the internship with the earliest interview displaying first.
- After running the command, the output in the UI should be similar to the one shown below.
The updated list of companies has been highlighted in red:
![]() Additional Information
Additional Information
-
Only companies with internships will be shown, regardless if a time period is specified.
-
If a time period is specified, only internships that have interviews within the specified time period will be considered when sorting
-
The
Nextfield and list of internships of the company will remain the same when executing this command -
In the following three scenarios, the command will succeed but the displayed list of companies will be empty:
- No companies with internships with interviews within the specified time period
- No companies with internships
- No companies
Clearing all contacts: clear
Start from a clean slate instantly by clearing your contacts.
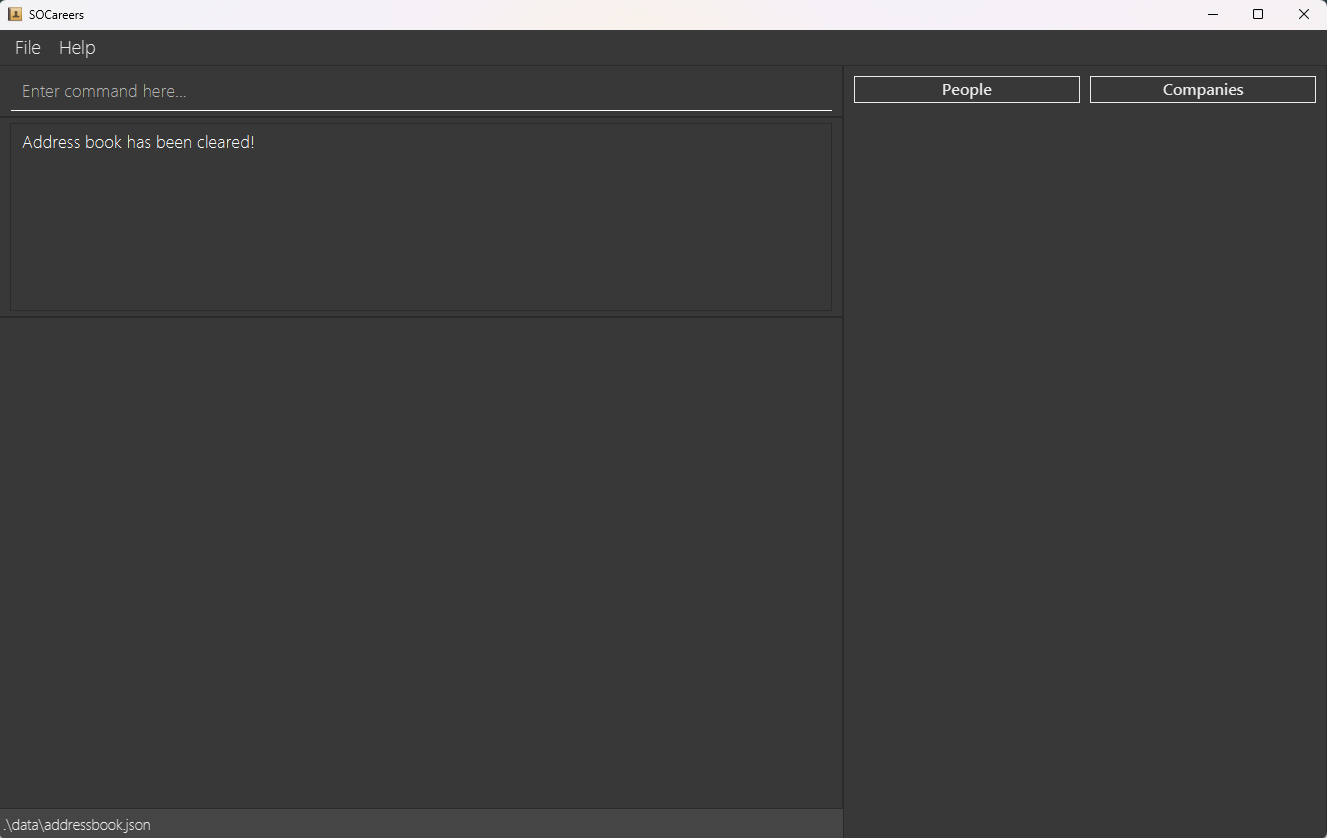
Format: clear
![]() Warning
Warning
This is irreversible and will delete all contacts you have added! Make sure you make a copy of the
data folder in the home folder of SOCareers as a backup before executing this command.
- After running the command, the output in the UI should be similar to the one shown below:
Exiting SOCareers: exit
Exit SOCareers by using the exit command.
Format: exit
Frequently Asked Questions (FAQ)
Q: How do I transfer my data to another computer?
A: Install SOCareers in your other computer and overwrite the empty data file it creates with your current data file that contains
the data.
Q: Do I need to save my data myself?
A: No, your data is saved after every command you enter so you never have to worry about losing your data!
Known Limitations
Limitation: After editing the contact currently in the display box, its old information is still displayed in the display box.
Workaround: You can run the view command on the corresponding contact to view the updated information.
Limitation: After deleting a contact from SOCareers, it is still displayed in the display box.
Workaround: You can view another contact using the view command after which the deleted contact will no longer be shown in the display box.
Limitation: Once you add a SCHEDULED_INTERVIEW_TIME to an internship, it cannot be removed, only edited.
Workaround: You can delete the internship and add it without the SCHEDULED_INTERVIEW_TIME to SOCareers.
Command Summary
| Action | Format | Examples |
|---|---|---|
| View User Guide | help |
N/A |
| Add Person | add p n/PERSON_NAME p/PHONE_NUMBER e/EMAIL a/ADDRESS [t/TAG] |
add p n/John Doe p/98765432 e/johnd@example.com a/311, Clementi Ave 2, #02-25 t/friends t/colleagues |
| Add Company | add c n/COMPANY_NAME p/PHONE_NUMBER e/EMAIL d/DESCRIPTION [t/TAG] |
add c n/TikTok p/98765432 e/tiktokHiring@example.com d/Top Tech Company t/tech t/interested |
| Add Internship | add i INDEX n/ROLE_NAME d/DESCRIPTION [s/SCHEDULED_INTERVIEW_TIME] |
add i 3 n/Marketing Intern 2024 d/Conduct market research and analysis s/20-02-2024 09:45 |
| List All Persons | list p |
N/A |
| List All Companies | list c |
N/A |
| Delete Person | delete p INDEX |
delete p 2 |
| Delete Company | delete c INDEX |
delete c 2 |
| Delete Internship | delete i c/COMPANY_INDEX i/INTERNSHIP_INDEX |
delete i c/2 i/1 |
| View Person | view p INDEX |
view p 1 |
| View Company | view c INDEX |
view c 1 |
| Edit Person | edit p INDEX [n/PERSON_NAME] [p/PHONE_NUMBER] [e/EMAIL] [a/ADDRESS] [t/TAG] |
edit p 1 n/Tim e/tim@example.com a/123, Ang Mo Kio Ave 2, #02-26 t/friends |
| Edit Company | edit c INDEX [n/COMPANY_NAME] [p/PHONE_NUMBER] [e/EMAIL] [d/DESCRIPTION] [t/TAG] |
edit c 1 n/AlphaGrep e/alphaGrep@example.com d/A cool company t/tech |
| Edit Internship | edit i c/COMPANY_INDEX i/INTERNSHIP_INDEX [n/ROLE_NAME] [d/DESCRIPTION] [s/SCHEDULED_INTERVIEW_TIME] |
edit i c/1 i/1 n/Finance Intern 2024 s/20-02-2024 09:45 |
| Find Person | find p [n/KEYWORD] [t/TAG] |
find p n/John t/friend |
| Find Company | find c [n/KEYWORD] [t/TAG] |
find c n/AlphaGrep t/tech |
| Sort Companies | sort c [start/START_DATETIME] [end/END_DATETIME] |
sort c start/01-02-2024 00:01 end/01-04-2024 00:01 |
| Clear All Contacts | clear |
N/A |
| Exit | exit |
N/A |